dBpoweramp Batch Ripper™: In Operation


Load Batch Ripper from Start >> Programs >> dBpoweramp Music Converter >> dBpoweramp Batch Ripper:

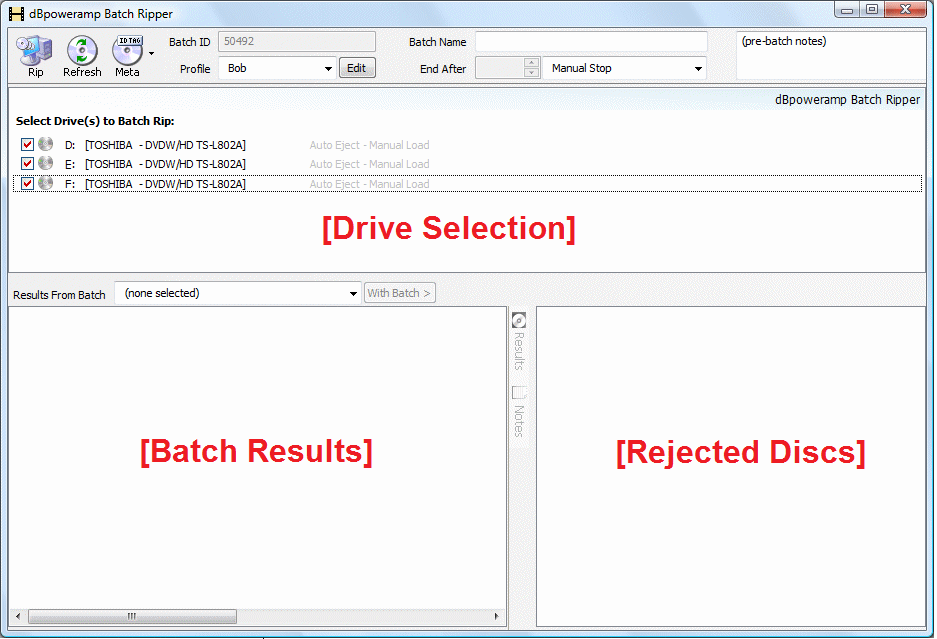
Batch Ripper is split into three sections: Drive Selection, Batch Results & Rejected Discs. The sections Batch Results & Rejected Discs are populated whilst ripping. Drive Selection is used to select which drives (previously configured with Batch Ripper Configuration) are to be used for batch ripping, removing a check mark next to a drive excludes it from ripping.

The following items should be reviewed before ripping:

Batch ID: assigned automatically, each batch has a unique identification number

Batch Name: can be used to store a job identification, typically the clients name. Batch Name & Batch ID are listed in Results From Batch after a batch has completed, allowing previous jobs to be reviewed.

Pre-Batch Notes: stores extended information on a job, viewable from the notes section.

End After: controls the process of when a batch is to complete, can be either:

  • Manual Stop is the default option where the batch is finished by manually clicking End Batch,

  • Discs Ripped a fixed number of discs to be ripped is set, once reached the batch is automatically ended,

  • Failed Disc Loads specifies that once a number of consecutive disc loads have failed to load a disc (perhaps from an autoloader) the ripping is ended.

Profile sets which backend profile is to be used in CD Ripper, many options such as Encoder used or the output path are set in CD Ripper and can be edited by clicking Set. Refer to the CD Ripper help file for more details. When setting the output path the following naming variables can also be used: [batchname]  [batchid]  [profile].
 

 Batch Ripping  

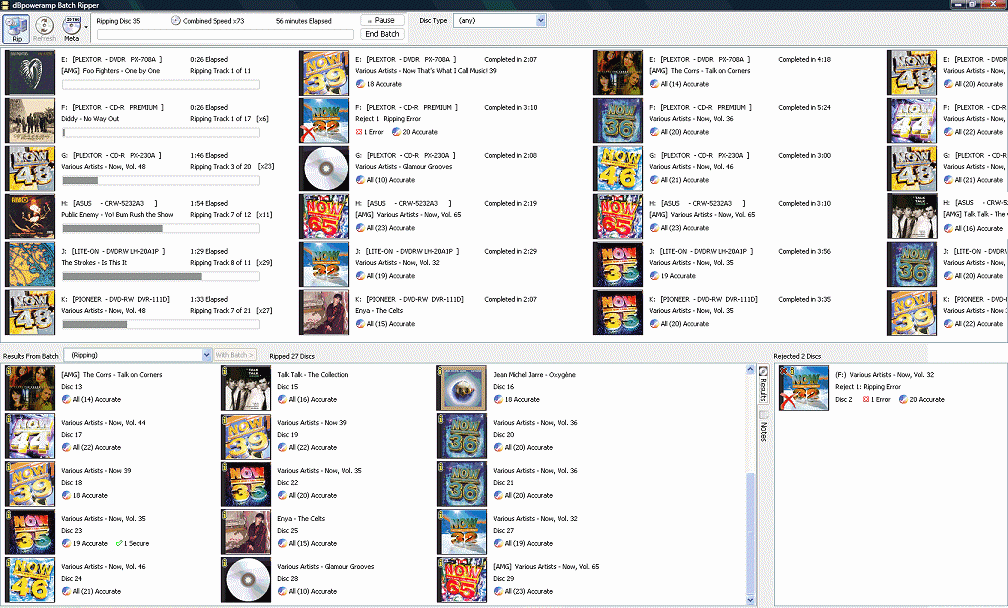
To begin Batch Ripping click the Rip button, instantly the [Drive Selection] section is replaced with a ripping representation. Each line in the ripping representation section represents a CD drive, current actions are shown to the left of that section, with ripped discs shown sequentially to the right:

Each drive progresses independently of other drives. Completed rips are shown in the bottom left Results from Batch section, with rejected discs appearing in the bottom right section. If a disc is rejected a brief reason is shown on the Reject x: line, to find a more detailed explanation right click on the Rejected Disc and select View Error / Information / Filenames. It is also possible to browse to, or delete the actual audio files by right clicking on a disc in the Results or Reject Section and selecting Browse to Files, or Delete Files.

Pause button can be used to temporarily pause the loading / unloading of discs, note how ether that pause does not pause discs which are being actively ripped.

Disc Type is used with the Manual Input & Review page (covered in detail in the next section Meta Options), Disc Type is used to verify that the Meta Data retrieved matches the expected Disc Type (either part of the box set, or not part of the box set). The CDs would be separated into two batches, normal CDs and box set CDs. If the meta data did not match the expected type the Manual Input & Review page would be shown if the option 'When Disc Count Does Not Match Expected' is checked in the meta data options.

By right clicking on an active ripping drive (top left) it is possible to individually cancel discs, or to view the ripper as it rips the individual tracks. 

 Meta Options  

Active Providers

Sets which meta data providers are to be used, if the option Intelligent Meta From all Enabled Providers is enabled then all providers checked are used simultaneously and errors in the meta data  are removed by cross checking results from all providers. Of the providers GD3 is a commercial provider and charge a per disc look up rate, freedb, discogs and MusicBrainz are free to use.

GD3 when an account is created (independent of normal GD3 commercial accounts) by clicking [ Acquire Username Password ], the same name and password can be used on multiple computers.

The Intelligent Meta Data option (called PerfectMeta in the standard dBpoweramp program) works better the more providers are enabled.

Manual Input & Review allows the meta data to be manually reviewed before each disc is ripped, this review page can be displayed unconditionally by checking Manual Input & Review, or conditionally depending on meta data parameters (see the section Force Manual Input & Review).

Meta Options 

Tag Mappings examples:

IF Genre=[anyvalue]               set if Genre if contains a value
SET Genre=Rock

IF Genre=                             set genre if contains nothing
SET Genre=Unknown

IF Genre=Alt Rock                 all genres
SET Genre=Rock

IF Album=Christmas              example showing setting a different tag
SET Genre=Christmas

IF Artist=The Beatles             fixed changes
SET Artist=Beatles, the

IF Album Artist=The Beatles
SET Album Artist=Beatles, the

IFCONTAINS Album=Best of   for generic albums, add the artist name
SET Album=[album], [artist]

IF Album Artist=                     set album artist if empty (from artist)
SET Album Artist=[artist]

IF Artist=                                if no artist then set to unknown
SET Artist=Unknown Artist

Character / Word Replacement allows individual characters or whole words to be substituted with another character or word, or to be deleted when no substitution is specified. Examples:

(Disc1)[nocase]


ö o
remove (Disc1) or (DisC1)
set ö to o

Resize Album Art Down to is useful if using a scanner to scan album art work.

Multi-CD Add Disc to Album by default will add the disc number to the album ID Tag when the disc is part of a multi-CD collection (box set).

Lead Artist to First Position scans all the artists (sometimes a track has multiple artists) and the artist present on all tracks, is set to the main (first artist).

Set Track Artist to Artist with > 70% of Track Coverage is useful for CDs where the artist is not consistent across all the tracks (ie one or two tracks have a different artist, where the CD is clearly not a compilation CD).

Disallow Multi xxxx many of the meta data providers can supply multiple artists, etc. for a single track, this option drops all but the first item.

Detect 'xxx, yyy' in Artist and Swap to 'yyy xxx', sometimes the artist is stored as lastname, firstname. This option will detect and swap these items.

Replace 'The [artist]' with '[artist], The'  will take something like The Beetles and set as Beetles, The (which is easier for searching)

Each Track Genre The Same corrects inconsistent Genres across tracks, to the main Genre.

Detect Multi artists from '&', 'ft.' & 'feat.' on meta data providers such as freedb and MusicBrainz there is no multiple artist stored, it is upto the user who in many occasions will type Main Artist (ft. Contributing Artist)

Force Manual Input & Review

Manual Input & Review of the meta data can be displayed conditionally on certain conditions such as when no meta data was received.

GD3 Meta Options - this section allows for the sign up of an GD3 user account, note this account is different to standard GD3 accounts. Multiple computers can use the same account details.

  Main Index